

/image%2F1896565%2F20151110%2Fob_2178fa_1.jpg)
Solve MTS no sound issue in Adobe Premiere Pro
Outiline: How to import .mts files to Adobe Premiere Pro without loss. Here is an easy way for Mac to solve MTS no sound issue in Premiere Pro on Mac OS X El Capitan.
Adobe Premiere Pro is a necessary professional video editing software for working. Sometimes we import MTS files into Premiere Pro on Mac OS X El Capitan, the sound/audio is gone after a couple of minutes.
First method:
“Right click on the audio track on the furthest left part (where you would click to select which track to use for inserts and overwrites.) On the drop down menu click 'Default Source Assignment'”. However this way takes much time for us and the video quality cannot be ensured.
Second method:
AVCHD file structure must be preserved when you copy from an SD card to your workstation, you have to copy everything exactly as it appears on the SD card, and the audio files are separate from the MTS files. This way is also not convenient and time consuming.
Third method:
If the MTS file is with the right video codec but wrong audio codec like AC3 or other audio codec, we will only edit MTS with no sound on Premiere Pro. Is any possibility to import MTS to Premiere Pro smoothly? Yes, we need a professional MTS video converter to get the formats compatible with Premiere Pro.
iFastime Video Converter Ultimate for Mac can encode MTS files into the formats that Premiere Pro supports, including WMV, MPEG-2, MOV, etc. After encoding MTS files, we can edit them on Premiere Pro, now it has sound. (Read review) You can follow these steps to transcode MTS file to Premiere Pro on Mac OS X El Capitan.
Hot Search: MTS to Mac OS X El Capitan, MTS to DaVinci Resolve, 3D MTS to 3D TV
Free Download or Purchase iFastime Video Converter Ultimate for Mac:


Other Download:
- Cnet Download: http://download.cnet.com/iFastime-Video-Converter-Ultimate/3000-2194_4-76448683.html
- Top 4 Download: http://www.top4download.com/ifastime-video-converter-ultimate-for-mac/hekvsosm.html
- WinSite Download: http://www.winsite.com/Multimedia/Video/IFastime-Video-Converter-Ultimate-for-Mac/
- Softonic Download: http://ifastime-video-converter-ultimate-for-mac.en.softonic.com/mac
Workflow to re -encode MTS to Adobe Premiere for Mac OS X El Capitan
Step 1. Install and launch the MTS file converter on Mac, and then click “Add video” button to import .mts files. You can directly drag and drop video clips to file converter. Batch conversion is available, so you can add several files at one time.
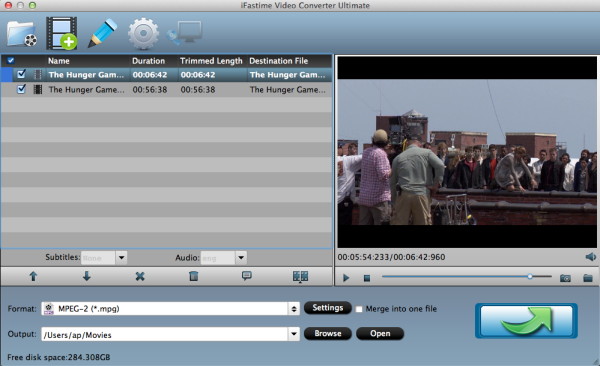
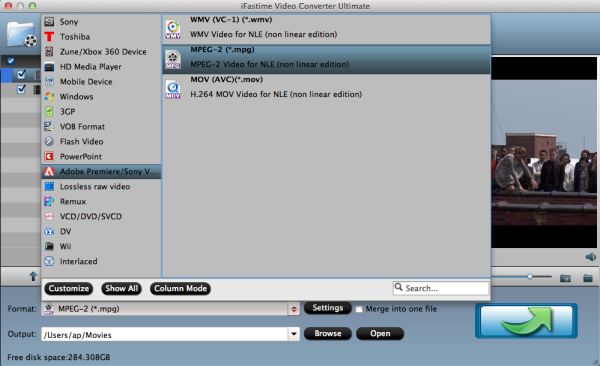
Step 2. Hit Format bar to select the wanted video format from the profile list. Here just take "Adobe Premiere/Sony Vegas" > "MEPG-2(*.mpg)" as the output format.
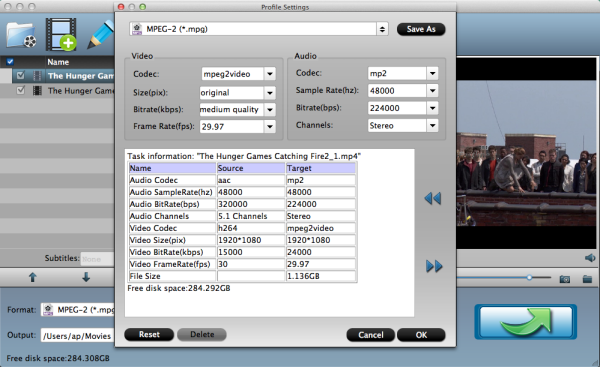
Tip: In case the default settings do not fit your requirement, you can click "Settings" button and enter "Profile Settings" panel to adjust video size, bit rate, frame rate, sample rate and audio channels.
Step 3. Finally, hit the "Start conversion" button at the bottom right corner and the conversion from MTS to Adobe Premiere Pro will begin immediately on your Mac OS X El Capitan.
After conversion is complete, click “Open” you can import converted MTS files to Adobe Premiere Pro CS4/CS5/CS3/CS6/CC for further editing without problem.
Have more questions about how to work with MTS in Premiere Pro, please feel free to contact us>> or leave a message at Facebook.
More Topics:
- Workflow to Edit MP4 files in Adobe Premiere Pro
- Best Way to Bring MP4 into Final Cut Pro
- Edit Sony PXW-FS5 4K XAVC in Premiere Pro CC/CS6/CS5
- Import AVI to Premiere Pro on Mac
- Import GoPro Hero4 Black 4K video to Premiere Pro
- Load DJI Osmo 4K video in Premiere Pro CC


/http%3A%2F%2Fitunesky.com%2Fwp-content%2Fuploads%2F2015%2F11%2Fquick-time-formats.png)
/http%3A%2F%2Fitunesky.com%2Fwp-content%2Fuploads%2F2015%2F10%2Fmac-download.png)
/https%3A%2F%2Fassets.over-blog.com%2Ft%2Fcedistic%2Fcamera.png)
/http%3A%2F%2Ffcpguide.altervista.org%2Fwp-content%2Fuploads%2F2016%2F04%2Fmxcpadobe_premiere_pro.png)
20% OFF Christmas Gifts at iFastime

——————————————————————————————————————— iFastime Video Converter Ultimate

iFastime Video Converter Ultimate offers a great solution to convert videos as well as convert Blu-rays and DVDs to play on multimedia devices. Adopts the latest encoding/decoding technology in the market which will give you the highest 4K video converting effects.
iFastime Mac Video Converter Ultimate

The best Mac video software ever, that allows users to easily enjoy common, HD, 3D and 4K videos as well as DVDs & Blu-rays on multimedia devices. Easily convert any videos and movies to editing in FCP, iMovie, Premiere, Avid, etc.; to upload to Youtube/Vimeo, etc.
Downlod Now Buy Now
Subscribe to be notified of future posts.
- 3 MTS
- 1 1080p converter
- 1 MXF
- 1 Premiere Pro
- 1 add mts to itunes
- 1 bpva to davinci resolve
- 1 compress .mov videos to dropbox
- 1 compress large mov
- 1 compress mov to small size
- 1 convert 1080p
- 1 convert 1080p hd files
- 1 convert avi to Davinci Resolve
- 1 convert m2ts into windows movie maker
- 1 convert mkv to youtube
- 1 convert mts to itunes
- 1 convert raw mov to apple tv
- 1 convert vob files to imovie
- 1 edit bpva in davinci resolve
- 1 edit jvc mts to vimeo
- 1 edit mxf in corel videostudio pro
- 1 edit mxf in premiere pro
- 1 encode .mov videos to dropbox
- 1 encode h.265 video from samsung nx1 onto youtube
- 1 encode mkv to roku 4
- 1 encode vob files to imovie
- 1 enjoy jvc mts on vimeo
- 1 extract audio from ogv
- 1 fix mov without video
- 1 imovie cannot recoginze mts
- 1 import avi to Davinci Resolve
- 1 import bpva to davinci resolve
- 1 import m2ts into windows movie maker
- 1 import mov to apple tv
- 1 import mov videos to dropbox
- 1 import mts to adobe premiere pro
- 1 import mts to itunes
- 1 import mxf to corel videostudio pro
- 1 import mxf to premiere pro
- 1 import vob files to imovie
- 1 load mxf to premiere pro
- 1 mov with audio only
- 1 mts to imovie
- 1 ogv converter
- 1 ogv to sony movie studio
- 1 play canon raw mov on apple tv
- 1 play wmv on samsung smart tv
- 1 quicktime
- 1 re-encode mts to adobe premiere pro
- 1 resize mov
- 1 rewrap mts in quicktime. Open mts in quicktime
